This posting is where I’m going to post the steps that I took to do the following: 1) set up Visual Studio Code to work with Containers 2) download docker images 3) connect to various containers which all are geared up to build a python-flask-PG DB application 4) work with alembic and flask to work with the Postgres database which also is in another container. Mostly to serve as a point of reference for later.
I installed Docker Desktop on my home workstation (Mac OS), which also allows me access to Docker CLI on my terminal command line.
In VSC, in the Extensions tool on the left side, I installed ‘Dev Containers’, hosted by Microsoft. This allows me to access the container envs using VSC, such as building code or using the CLI (pretty cool I have to say!)
Downloaded pg_container image, pgadmin_container, flask_container. Got those running with the Docker engine with:
$ docker run <container> // same as one below (start container)

$ docker compose up -d // start container

$ docker exec -it <container_name> sh //start up CLI within the docker container
There’s a docker-compose.yml (yaml) file that needs to be in the project folder. The $ docker compose commands all reference that file, so you have to be within that folder within the File System hierarchy to run those kinds of commands. Like the ones above.
The usage of virtual environments are useful for keeping boundaries on prrojects:
$ python -m venv venv // create virtual env

$ source venv/bin/activate // activate virtual env
Steps for Project
3 running containers: pg_container, flask_container, pgadmin_container on Docker Desktop
In the flask_container, accessed via VSC Extension, move to the app folder which contains a text file that lists the needed packages for the project. That is installed using:
$ pip install -r requirements.txt In this example, that will include:
alembic 1.14.0
blinker 1.9.0
click 8.1.7
Faker 30.8.2
Flask 3.0.3
Flask-Migrate 4.0.7
Flask-SQLAlchemy 3.1.1
greenlet 3.1.1
itsdangerous 2.2.0
Jinja2 3.1.4
Mako 1.3.6
MarkupSafe 3.0.2
pip 23.2.1
psycopg2-binary 2.9.10
python-dateutil 2.9.0.post0
six 1.16.0
SQLAlchemy 2.0.36
typing_extensions 4.12.2
Werkzeug 3.1.3
Now, we can list them in the venv using $pip list
In the root app folder, create alembic folder, cd into that folder, and initialize alembic with:
alembic init .This results in the following populating the alembic folder: README alembic.ini env.py script.py.mako versions
- versions/ is a folder where migrations files will be generated
- README is a place for you to document any notes and/or code snippets.
- env.py contains instructions for how Alembic should connect to the database.
- script.py.mako is used by Alembic to generate migration files (which will be stored in the versions/ folder).
- alembic.ini includes the settings for alembic. We will rely on the defaults for all settings except sqlalchemy.url.
A stdout message is provided during initialization noting the need to configurre the connection setting in alembic.ini file (see above): The sqalchemy.url variable is updated to point to the correct Posgres dB
Alembic acts as a type of VCS for database, allowing one to roll forward or back changes. Here are some useful commands:
- alembic revision creates a new migration file in the versions folder and assigns it a “revision ID”.
- alembic upgrade <revision_id> applies migrations through the given ID.
- alembic downgrade <revision_id> rolls back migrations through the given ID.
- alembic history lists the migrations in order.
- alembic current prints the revision ID for the current version of the database.
This is just an example, but we will use alembic to create a customers table.

$ alembic revision -m "create customers" // creates the file but it isn't run yet

# this will create an alembic version (under said folder within VSC Code Explorer), open it up in VSC to update def upgrade () and def downgrade () functions:

def upgrade():
    op.execute(
        """
        CREATE TABLE customers(
            id SERIAL PRIMARY KEY,
            name TEXT NOT NULL
        );
        """
    )

def downgrade():
    op.execute(
        """
        DROP TABLE customers;
        """
    )

Now, run the migration:
$ alembic upgrade head // this will create the customers table and also alembic_version
Note: this is to reset:
First, roll back any migrations that were successful by running the following command from the alembic/ folder:
alembic downgrade base

Second, open a bash terminal in the week3/ folder and use this command to remove the alembic/ folder:
rm -rf alembic

Finally, run the following command in git bash on your local computer to remove the alembic_version database table from the Postgres server, using psql:
docker exec -i pg_container psql week3 -c 'DROP TABLE IF EXISTS alembic_version'

You may also need to remove the customers database. Run this command in git bash on your local computer.
docker exec -i pg_container psql week3 -c 'DROP TABLE IF EXISTS customers'
RAW SQL vs ORM
A veteran systems computer mentioned that most programmers use RAW SQL vs ORM due to portability, ease of debugging. Need to learn SQL very well, even if you do use an ORM (flask, django for example).
In this exercise, use psycopg2 to connect to Postgres via Python code; this is an exercise in using Raw SQL queries:
- back in app folder, which contains: alembic, data folder, flask folderr, requirements.txt file, and venv folder:
- make sure psycopg2 is installed:
pip show psycopg2-binary - make sure venv is initiated
- make sure psycopg2 is installed:
- mkdir project folder, cd into it, touch project folder.py
- ex: mkdir veggies, touch veggies.py
- inside veggies.py file, build out script to connect to PG DB and run RAW SQL queries:
import psycopg2

# Connect to your postgres DB
conn = psycopg2.connect(
    """
    dbname=week3 user=postgres host=pg port=5432
    """
)
conn.set_session(autocommit=True)
# Open a cursor to perform database operations
cur = conn.cursor() # has instance methods to communicate with the database.
# we can use this cur cursor object and its instance methods to run raw SQL statements, formatted using multiline strings

cur.execute(
    """
    DROP TABLE IF EXISTS veggies
    """
)
# create and insert records
cur.execute(
    """
    CREATE TABLE veggies(
        id SERIAL PRIMARY KEY,
        name TEXT NOT NULL,
        color TEXT NOT NULL
    )
    """
)

cur.execute(
    """
    INSERT INTO veggies VALUES
    (1, 'carrot', 'orange'),
    (2, 'onion', 'yellow'),
    (3, 'zucchini', 'green'),
    (4, 'squash', 'yellow'),
    (5, 'pepper', 'red'),
    (6, 'onion', 'red')
    """
)
# Execute a query
cur.execute(
    """
    SELECT * FROM veggies
    """
)
# Retrieve query results
records = cur.fetchall()

print(records)

# additional code to increase UI appeal:

print('')  # new line

cur.execute(
    """
    SELECT color, name FROM veggies ORDER BY name, color
    """
)

veggie_records = cur.fetchall()

for i, v in enumerate(veggie_records):
    print(str(i+1) + ".", v[0].capitalize(), v[1].capitalize())
run this file, in VSC CLI, with: $ python veggies.py
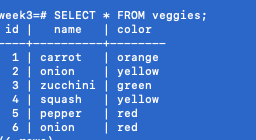
On Mac OS, check to make sure the values are populated in the table as expected:
- This has demonstrated how we can use the psycopg2 adapter to open a connection to a Postgres database with Python, then open a cursor to interact with that database.
- Note that many other programming languages have similar libraries for interacting with Postgres databases. So you’re not limited to using only Python with Postgres; you can use Node.js, Perl, PHP, .NET, and many other languages.
- Other relational database management systems, such as MySQL, MariaDB, MS SQL Server, etc, will have their own sets of database adapters for interacting with various programming languages.
Here’s the additional, UI improved code in action:

Now, for an ORM (SQLAlchemy)
As opposed to the RAW SQL queries just covered, there’s the ORM approach- in this case, sqlacademy. In the main app folder, we create a parent folder and cd into it:
mkdir sqlalchemy
cd sqlalchemy

touch veggies.py
# add the following:

from sqlalchemy import create_engine, Column, Integer, String
from sqlalchemy.orm import sessionmaker, declarative_base

# Connect to Postgres database
engine = create_engine('postgresql://postgres@pg:5432/week3')
Session = sessionmaker(bind=engine)
Base = declarative_base()

class Veggie(Base):
    __tablename__ = "veggies"

    # set autoincrement to use the SERIAL data type
    id = Column(Integer, primary_key=True, autoincrement=True)
    color = Column(String, nullable=False)
name = Column(String, nullable=False)- What does this code do?
- This defines a class named Veggie in Python which we will map to the veggies table in SQL.
- The first member variable we assign is __tablename__ which specifies the name of the SQL table this class should map to.
- Then, we use the SQLAlchemy-provided Column class to define the column mappings. Any extra member variables and functions that are added to this class will be available in the Python domain, but ignored when mapping to the SQL domain. We will demonstrate this with an example very soon.
- Following with our conventions, there is a primary key column named id with an Integer data type. However, the special parameter autoincrement=True we add to it will assign to it the SERIAL data type in Postgres, which is a special type of integer that is automatically incremented by Postgres when new records are added.
- Other constraints can also be defined such as nullability or uniqueness. You can see that the color and name columns have been defined as non-nullable.
- In a larger project, you would typically define the models in a separate file, typically named models.py.
# Recreate all tables each time script is run
Base.metadata.drop_all(engine)
Base.metadata.create_all(engine)

seed_data = [
    {'name': 'carrot', 'color': 'orange'},
    {'name': 'onion', 'color': 'yellow'},
    {'name': 'zucchini', 'color': 'green'},
    {'name': 'squash', 'color': 'yellow'},
    {'name': 'pepper', 'color': 'red'},
    {'name': 'onion', 'color': 'red'}
]

# Turn the seed data into a list of Veggie objects
veggie_objects = []
for item in seed_data:
    v = Veggie(name=item["name"], color=item["color"])
    veggie_objects.append(v)

# Create a session, insert new records, and commit the session
session = Session()
session.bulk_save_objects(veggie_objects)
session.commit()- What does this code do?
- First, it drops any tables that exist and then creates tables based on our model definitions. In this case, there is just one model, Veggie, and so we only expect to create one table, veggies.
- Then, it defines the initial data with which we wish to seed the table, using a list of dictionaries.
- Each dictionary contains two key-value pairs and represents a single record, with each key representing a column, and each value representing that column’s value for that record.
- This list is then looped over and transformed into a list of Veggie objects.
- In order to insert these objects as SQL records, we must first begin a new session.
- Then, we can pass our veggie_objects to the bulk_save_objects() method.
- Finally, to get SQLAlchemy to generate the SQL and perform the inserts, we call the session’s commit() method.
- Note: Sessions are short-lived and when closed or committed, any objects that are attached to them should be discarded.
Save the code and run it again:
python veggies.pyNow, we write queries using SQLAlchemy:
# Create a new session for performing queries
session = Session()

# Run a SELECT * query on the veggies table
veggies = session.query(Veggie).all()

for v in veggies:
print(v.color, v.name)- What does this code do?
- Firstly, since we committed our previous session to insert the veggie records, we need to open a new session to continue on.
- Then using the session.query().all() method, we retrieve all the records from the table created by the Veggie model and store them in the variable veggies as a list of objects.
- We then use a for loop to print the color and name of each of the objects in that list.
# SELECT * FROM veggies ORDER BY name, color
veggies = session.query(Veggie).order_by(
    Veggie.name, Veggie.color).all()

for i, v in enumerate(veggies):
    print(str(i+1) + ". " + v.formatted_name())
Add this to the Veggie’s model’s class def at the top of the file (indent right!)
   def formatted_name(self):
        return self.color.capitalize() + " " + self.name.capitalize()
Now, when we run the code again ( $python veggies.py ), we get:

